DIY Fishing Game

I have seen several tutorials for a DIY fishing game, but I wanted to create my own! After completing this project, I see where I could have saved a little time and where I messed up here and there. I'll share that "inside info" and give you some tips on how to do this yourself. Additionally, unlike other tutorials I've seen, this can be used for more than just numbers.
I'm not super crafty; I always burn myself with my hot glue gun. I only have a tiny sewing kit, and my stitches are crooked. I don't have a lot of tools that might have made this easier. But when I come up with a project idea, I like to use as much of my own stuff as possible, to keep the costs low. Finally, I apologize if I dumb this WAY down for some folks. I want to make it super clear so that it doesn't seem overwhelming.
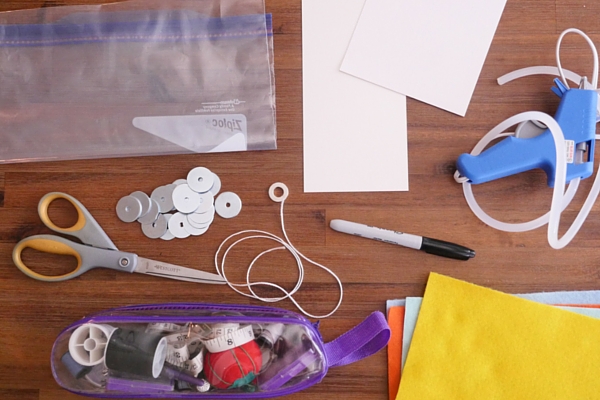
Here are the materials I used (minus the dowel I used as the fishing pole):
- plastic bag (or any sort of thick plastic... not like plastic wrap, which is thin)
- card stock to make a stencil
- hot glue gun
- scissors
- metal washers
- small ring-shaped super magnet
- string (for fishing line)
- Sharpie
- sewing kit
- 4 different colors of felt


I created two stencils: one for the fish and one for the pocket. I traced the fish 10 times per sheet of felt (to make 40 fish shapes, or 20 fish). MY FIRST MISTAKE: I freehanded the fish shape, so it wasn't perfectly symmetrical. Because later, I used 2 fish sandwiched together to make one fish, they didn't line up perfectly. I had to do a lot of cleaning up later, and most of them aren't as pretty as they could have been. What I could have done instead was use my freehand fish stencil, trace it once, then flip it over and trace it again. That way, they would have been mirror images of each other. That would have helped tremendously later on!
I created the pocket stencil by placing part of the card stock onto one of the fish, to be sure it would fit nicely. Then I used that to create 20 pockets. I thought about making 40, but I like the way they turned out, with the gills on the other side.
Cut out all of the fish. I had to use 3 different pairs of scissors, meant for different things (like for hair, for fabric, and for paper). I know you're not supposed to do that, but darn it, these things were a pain to cut out! I think if I'd had one great pair of super sharp scissors, it would have helped!
DON'T CUT OUT THE PLASTIC POCKETS! Cut around them so you've got a little edge. That will make it way easier to sew them on later! TIP! When you're cutting the plastic, just get the cut started and then push the scissors forward. They glide right through. It's much easier than actually cutting the whole time.

Here's how I assembled each fish:
- Cut out the fish.
- Turn 5 of the fish over so you can't see the Sharpie outline.
- Place one pocket square onto the side of the 5 fish.
- Sew it on, INSIDE the black line.

- Trim the black line using super sharp scissors.
- Cut some of the extra felt into small, curved pieces.
- Take the other 5 fish. Hot glue (or sew) the gills onto the non-Sharpie side of the fish.
- Be sure to mix up the colors!

- Flip over the 5 fish that have the pockets.
- Glue one washer onto that side. Make sure it's not totally on the edge; otherwise you won't be able to sew the fish closed.
- Place a gilled half on top of the pocket half.
- Glue them together. Then trim any ugly edges, if you want. (If you followed my tip above, you shouldn't have as many ugly edges as I did!)
Repeat that for all 4 colors of the felt! You should have 5 fish of each color.

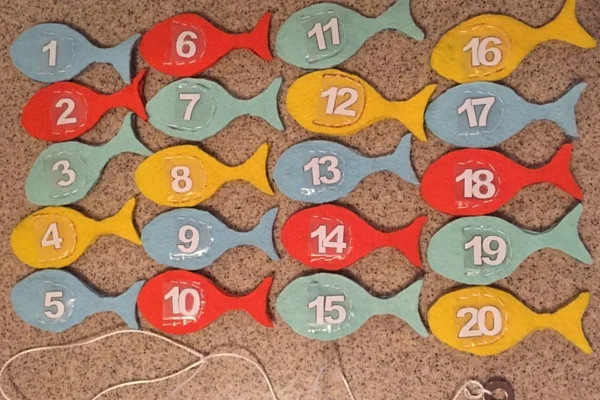
I used a font on my computer to make the numbers 1-20 that I liked. Then I changed the settings so they were outlines only. I printed those, cut them out carefully (using an exacto knife), laminated them, then cut out the numbers into a shape that would fit inside the little pockets.
I inserted the numbers into each of the pockets.
The last thing I needed to do was make the fishing rod.
I got a wooden dowel at the hardware store, but you could just as easily use a stick from your hard! I tied the string to the ring-shaped magnet. For added strength, I put a dot of hot glue on the string before pulling it tight to the magnet. Then I tied the string to the dowel.


Here are some ideas for how to use this game:
- Have your child pick up each number, in order. You can just have 1-10, or 1-5, or 11-20, or even odds, evens, or multiples.
- Put certain letters in the pockets, like D, O, and G. Call the word DOG and have your child pick up the letters in order, to spell DOG. (This would work for lots of words. You can use all 20 fish or as many as you need.)
- In each pocket, put a picture of an animal. Call out a fact, or an animal sound, and have your child pick up the appropriate animal.
- Using numbers again, call out "What is 2+3?" and your child would have to pick up the "5".
The ideas are countless, really. I wanted to use pockets so that I could this game setup for a LOT of things. It did take quite a bit of time, but it will hopefully last quite a while!

If you would rather just buy something like this, you can pick up a similar game from Melissa & Doug (affiliate). If you're crafty, or like making things from scratch, then try mine!