School Room Tour August 2016
I have since changed this arrangement, but these are the shelves for Alexander (3 years, 2 months) and Annabelle (6-6.5 months)! (I need to take some pictures of our new arrangement and will post that as soon as I find the time.) (Also I want to do some themed activities from now on. First theme is SPACE, so we'll do some space-related activities. Once they're compiled, I'll take pictures and share details in a "SPACE!" blog post.)

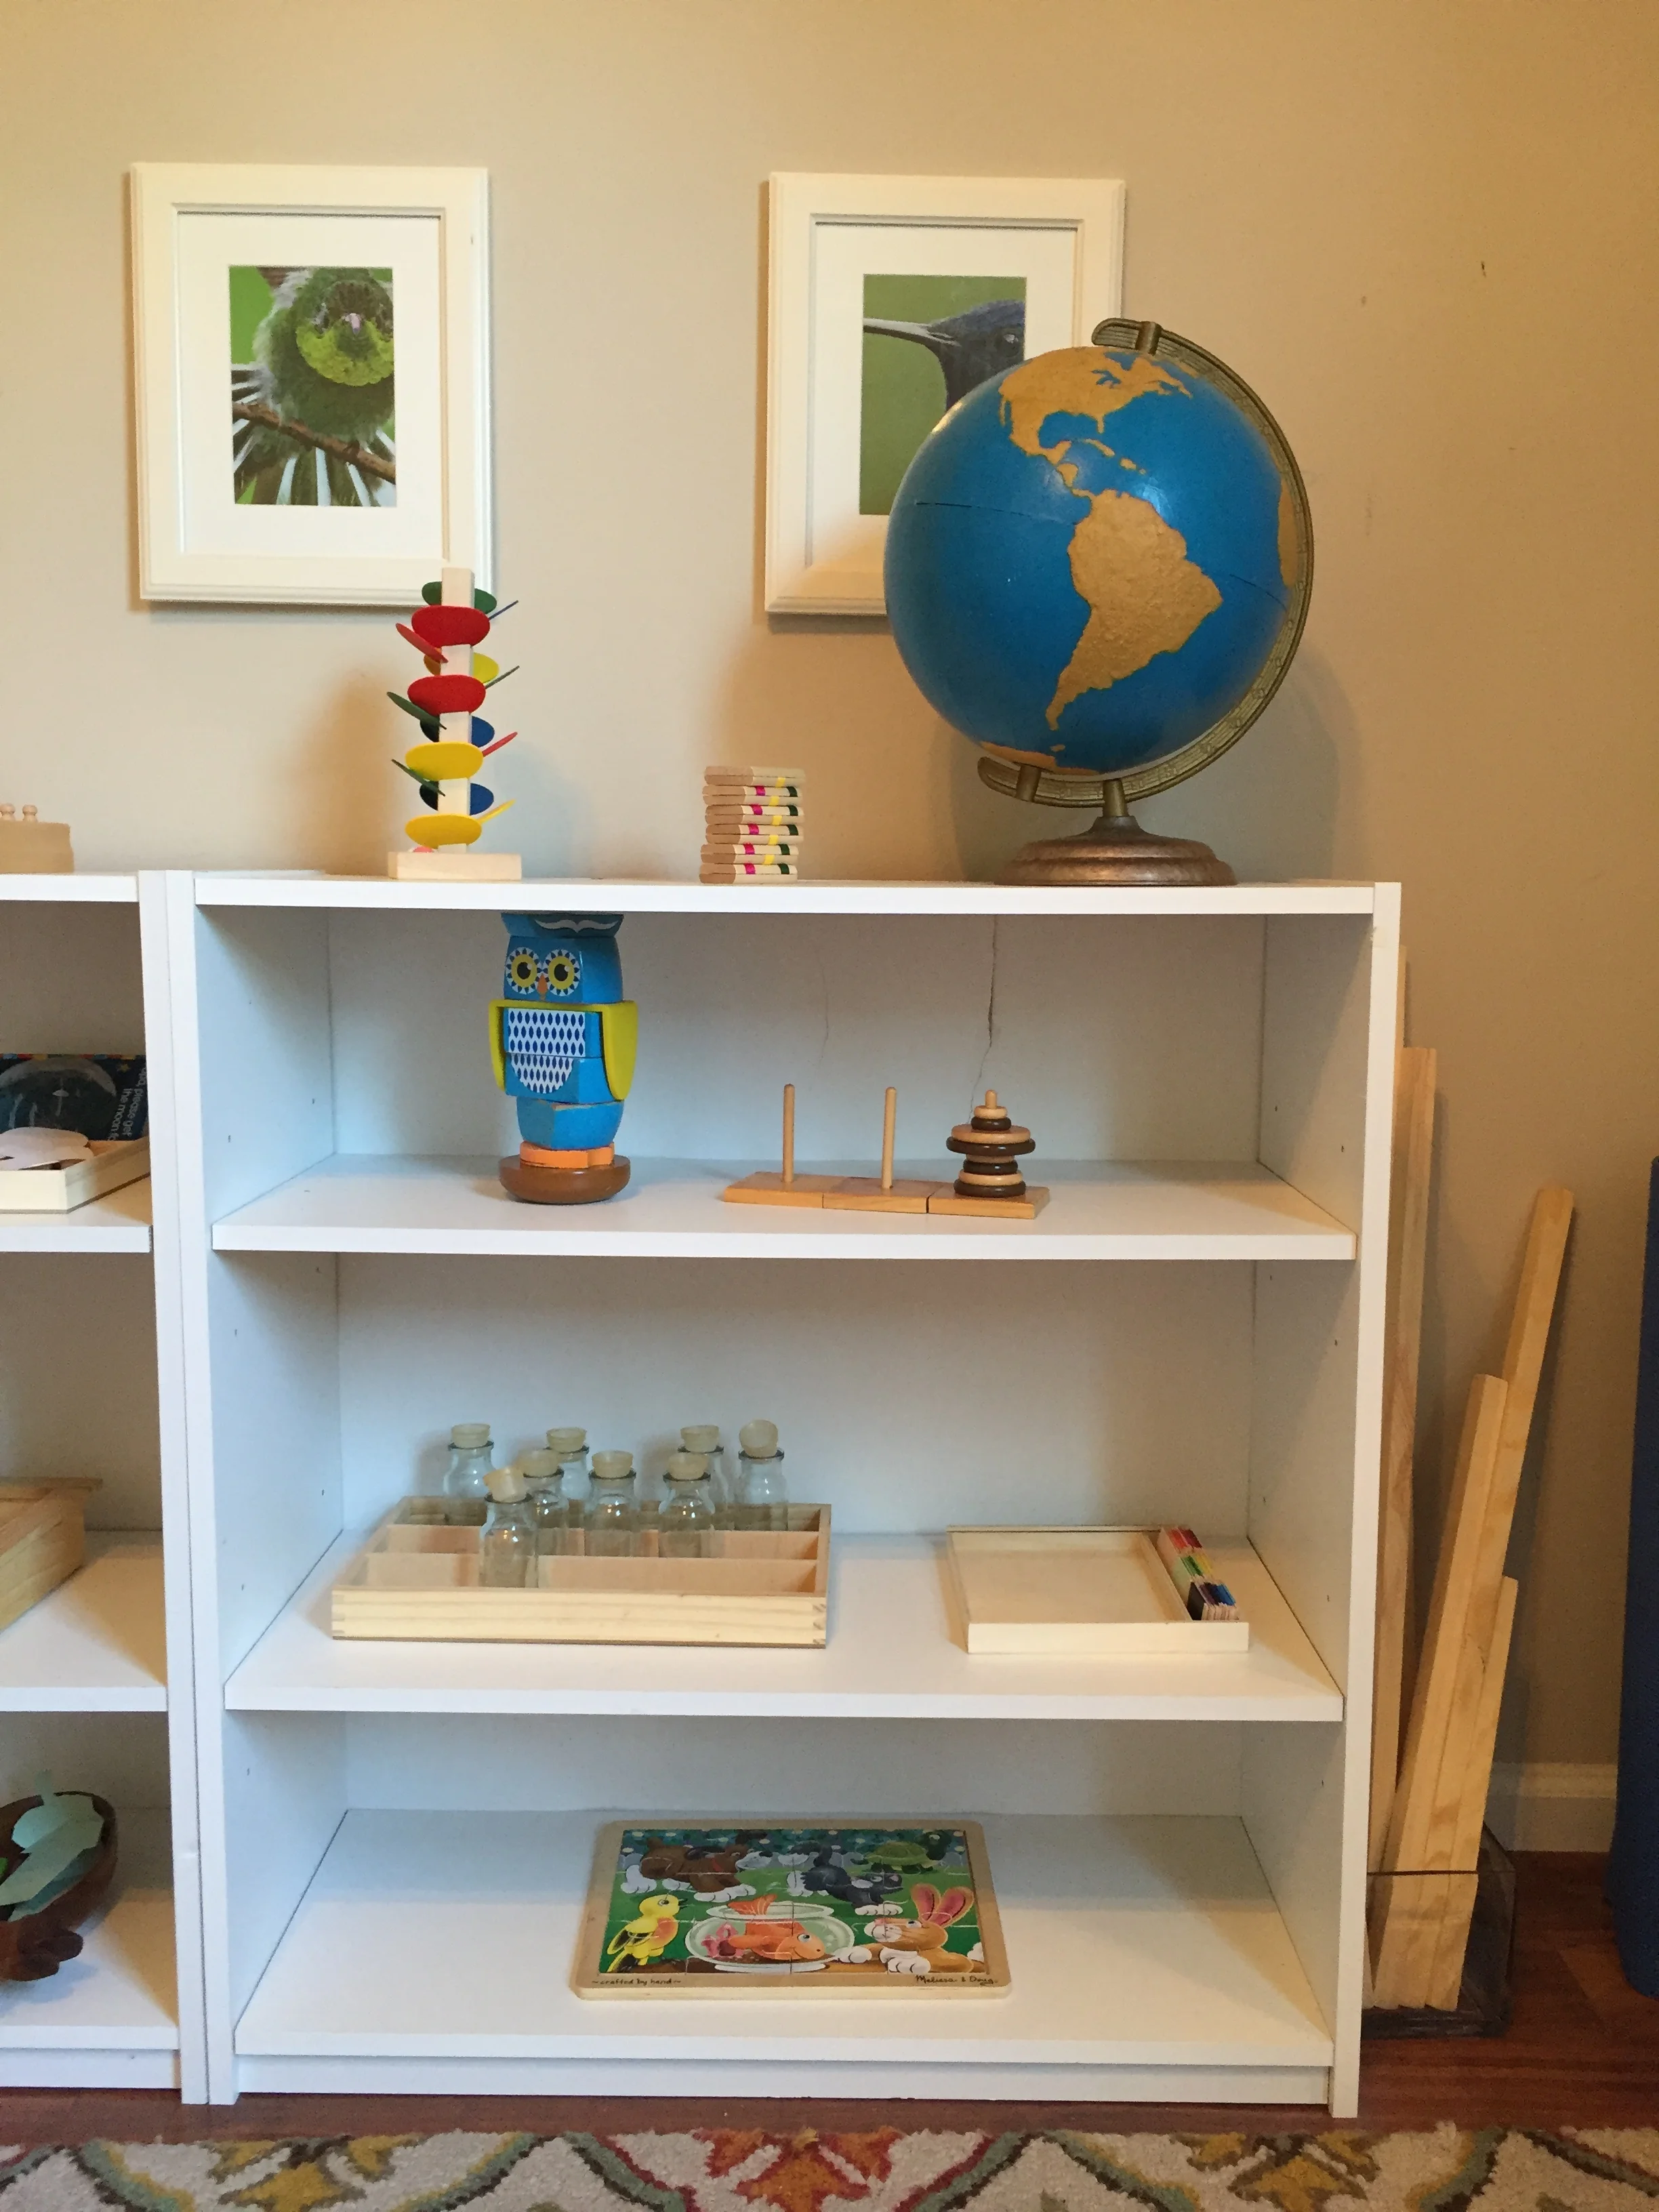
Here's the main set of shelves, for Alexander. I tried to simplify it since it felt overcrowded. I'm still learning as I go, but after exploring some blogs and the curriculum (Keys of the World) , I feel like I have a better grasp of what the Montessori classroom shelves should look like.
I've made a few things: the sandpaper globe and some "red rods", which are just natural wood color. (I explained my reasoning on my Instagram and FB, but essentially, the rods are meant to teach length discrimination, and the color red is so that when someone goes from one Montessori school to another, the materials are all identical. Natural wood is able to teach length discrimination as easily as the red. Mine are also shorter than the ones in a classroom, going from 3 to 30 inches as opposed 10 centimeters to 1 meter.)
The left shelf:
I got a set of cylinder blocks (top right), but we haven't done any official presentations or activities with them yet. He is obsessed with his Magna Doodle (middle left) so we are keeping it accessible at all times. He uses it on the couch, in the car, while I'm cooking, ALL the time.
Third shelf, right, is a box of beginning sounds. It's just got a few objects: Glue, Whale, Pineapple, and a few others. I'll name the objects, just to be sure we are using the same words. Then I will say "Can you point to the object that starts with Guh?" And he'd point to the glue. If he doesn't, then we just put it away and try a different day. If he does point to the glue, then we'd do the rest of the objects. After a little practice, then I'd pick up the pineapple, for example, and ask "What sound begins the word pineapple?" That's called a 3-part lesson. Once he masters all 3 parts, you consider that objects mastered and you can move onto the next objective. We'd do beginning sounds that are easy first. Like, "giraffe" starts with the letter G but not the sound Guh, so that's not really one you would start with.
Bottom shelf is for rubbing textures. I have some thin paper and some card stock shapes cut out, plus a few crayons with the paper removed. You put one of the shapes under the paper, then use the crayon to rub on top of the paper. And if you've done it correctly, you'll see the outline of the shape. It can be done with leaves and more textured objects, but for now, I just used some cut-outs.
Top left is a ball run. Two little balls bounce happily down the tower of "petals". It's relaxing to watch. Next to that is a Jacob's Ladder, which is also just sort of relaxing.
I made a land/water globe. I had a $5 outdated globe from the thrift store. I painted all the water with 3 coats of blue paint. Then I used two coats of glue and craft sand to fill in the land areas. Once it was dry, I put a layer of MATTE mod podge over the entire globe. It took me about 2 weeks, a few hours here, a few hours there. I love the finished look, but it is easier to just buy it if you can afford it! I believe they're about $30 online.
The next shelf has two puzzles I've had on display for ages. He loves the owl puzzle, and I leave the tower of Hanoi puzzle because I really want him to use it. I'm not sure why I'm obsessed with it!
The third shelf has two DIY materials. On the left are thermic bottles, which are not filled with water because bacteria.... But they WILL have water on the days I want to use them. I found a giant bag of small glass bottles at the thrift store for $3! I knew immediately they'd be great for the thermic bottles. I will fill 6 of them with water. I'll stick 4 bottles in the fridge, leave 2 on the counter, and fill the remaining 2 of them with hot water. After 10 minutes or so, I'll take out 2 of the cold bottles, and 10 minutes after that, I'll take out the last 2. Now I *should* have 2 cold, 2 cool, 2 room temp, and 2 warm bottles. And he will match them while we talk about the terms warmer and cooler.
Next to the thermic bottles are some DIY color tablets. I found a tutorial online using balsa wood, painters tape, acrylic paint, and mod podge. This is another DIY I wish I had just bought! It took a long time, and the gradients aren't perfect. Plus they are all mixed together; color tablets are meant to be multiple boxes with specific colors. Will I be able to use the ones I made to teach the same concepts? YES. So I am happy with that fact. But the actual process of making them was tedious (imho).
Next to the shelves, on the right, are the DIY "red rods" and 2 blue mats. I just took one blue yoga mat and cut it in half (it is 6 feet originally, so two 3-foot mats made more sense).

You can see the green tape on the floor, which is in the shape of a rough ellipse. That will be permanent. The chalkboard and bookshelves are the same, but I added a map above the chalkboard. I found $5 posters online, so I bought three (one of the USA, one world, and one solar system).
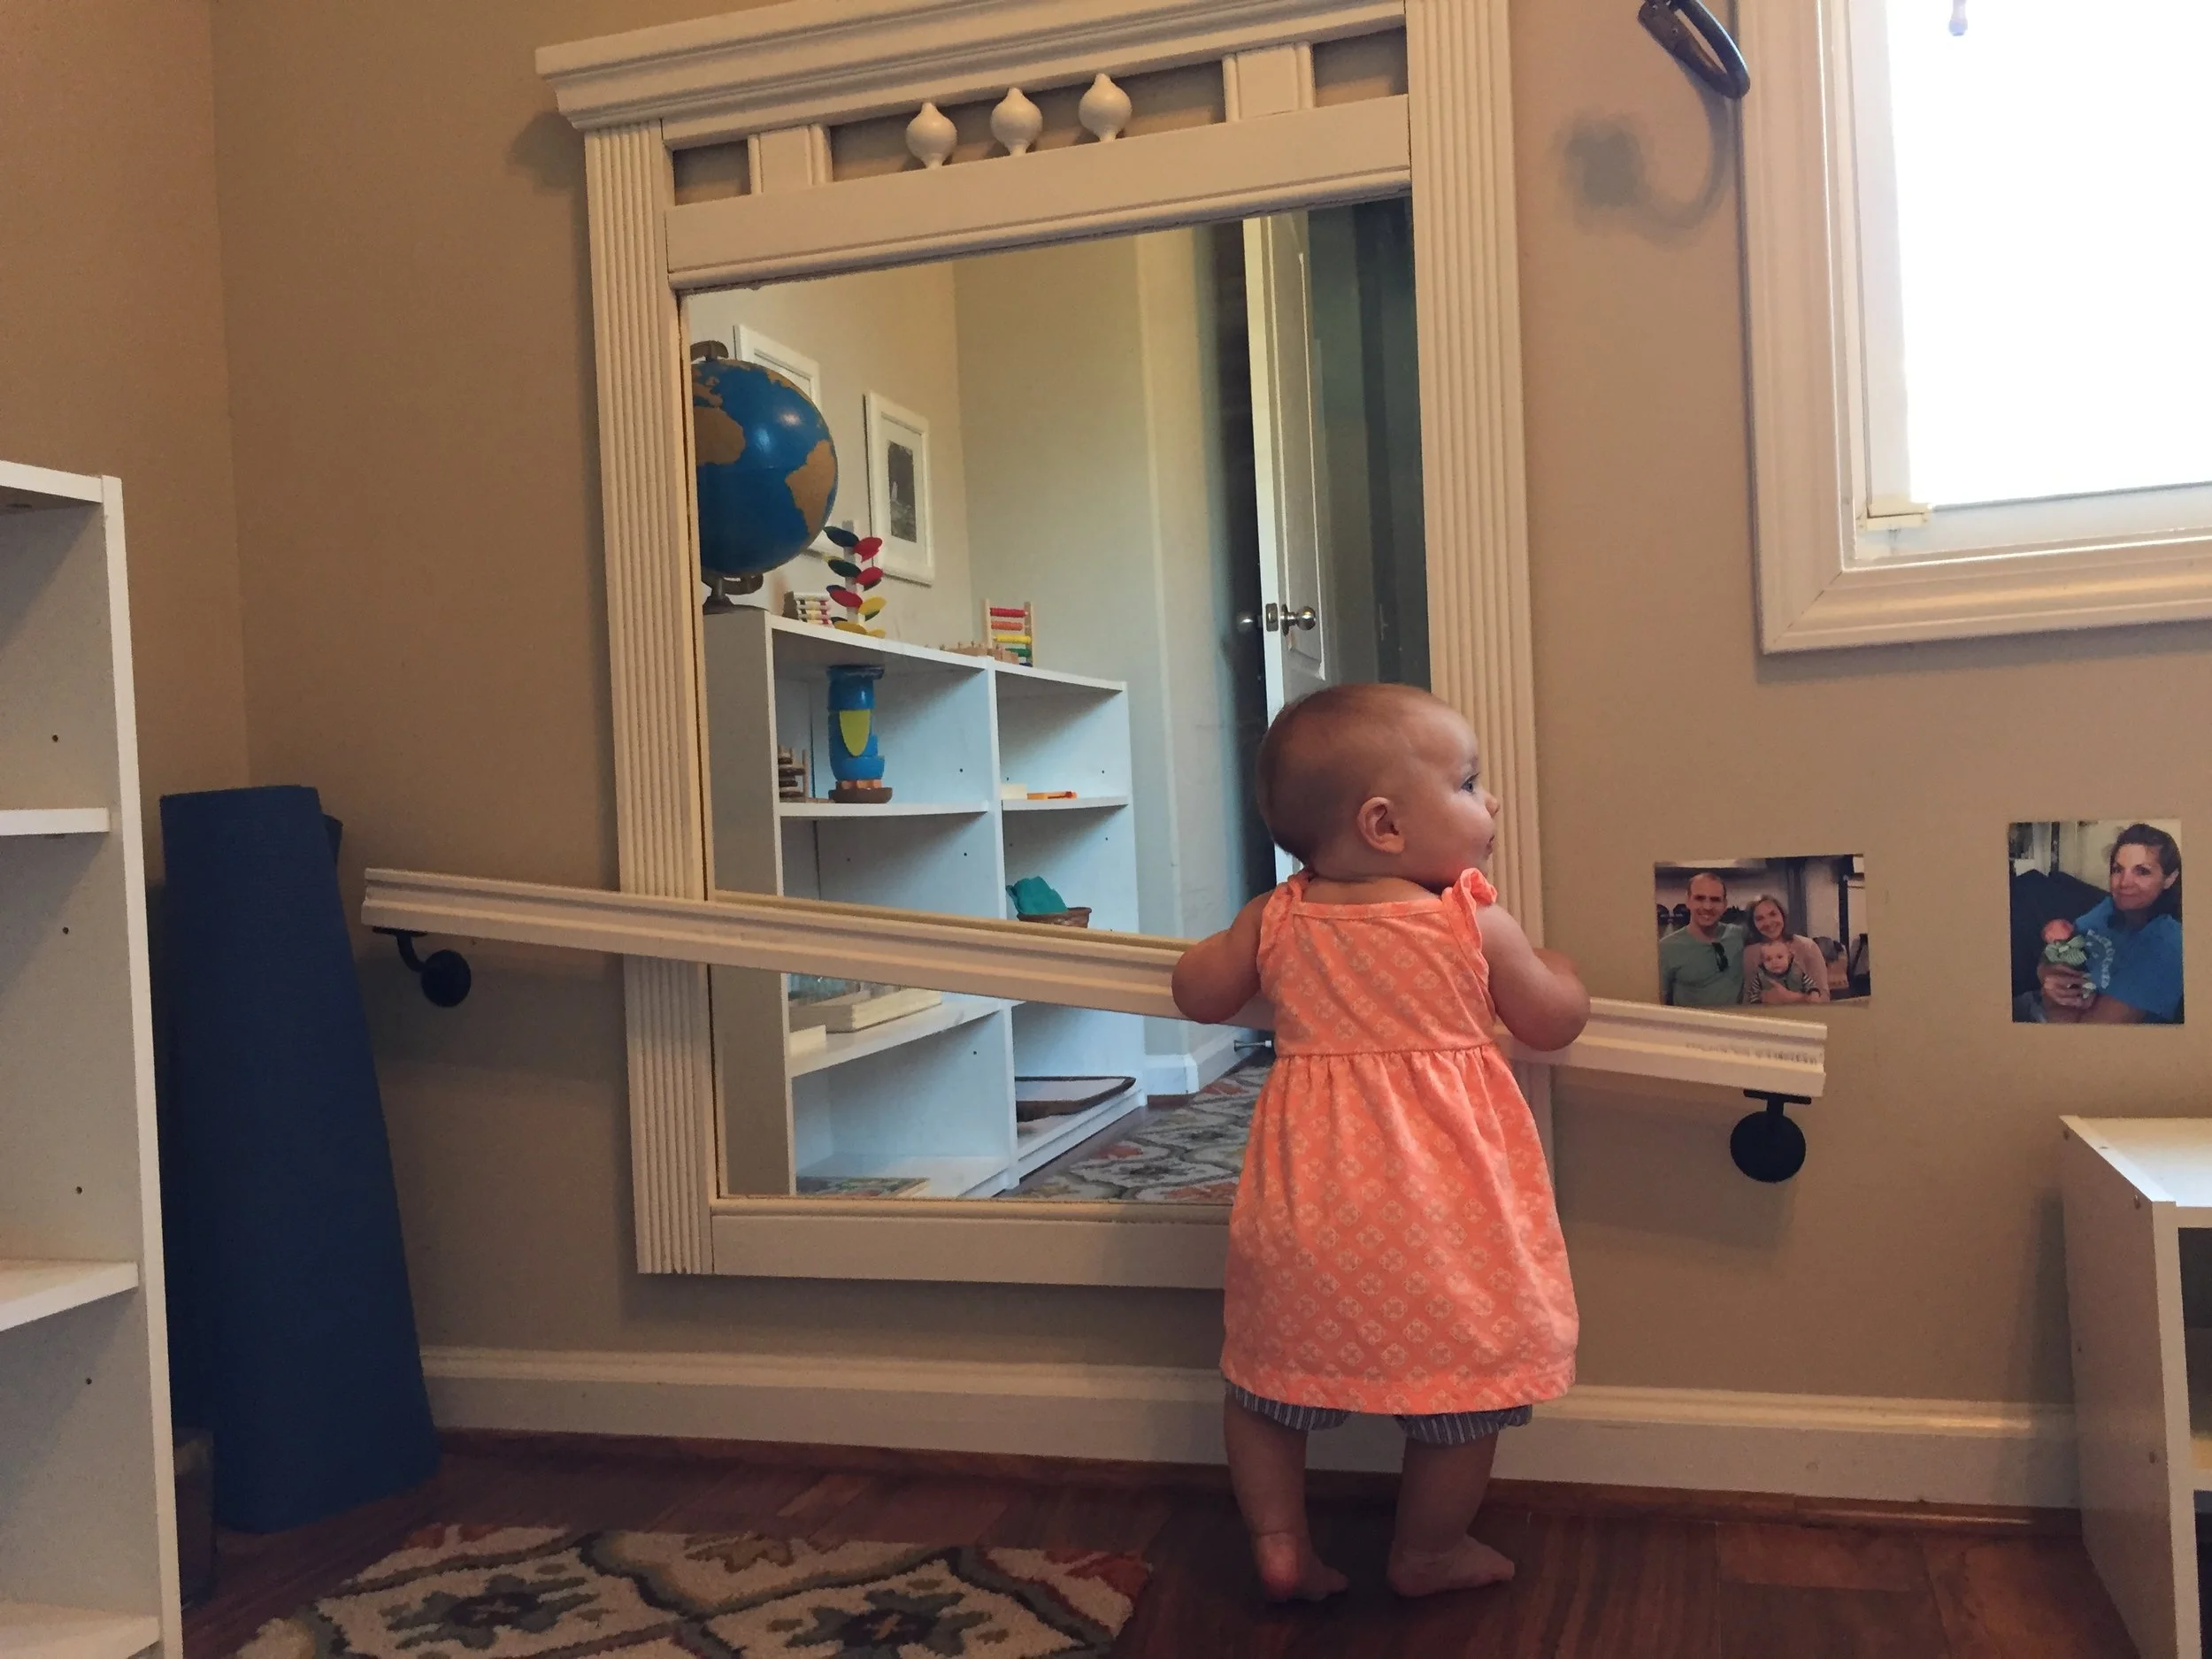
Here is one of the things for Annabelle. I found a scrap of trim at the hardware store (you pay by the foot for the scraps), plus I purchased two hand rail hardware sets. I attached this to the wall, into studs, at an angle so she could cruise from one side to the other. Since I messed up the first time I tried, and I left a giant hole on the wall, I hung a picture to cover the hole. :) It looked odd by itself, so I added some other pictures as well. (Funny enough, we don't have any PRINTED pictures of her, so these pictures are all of me, Cameron, and Alexander!)
The mirror has been there, but the handrail addition is perfect.
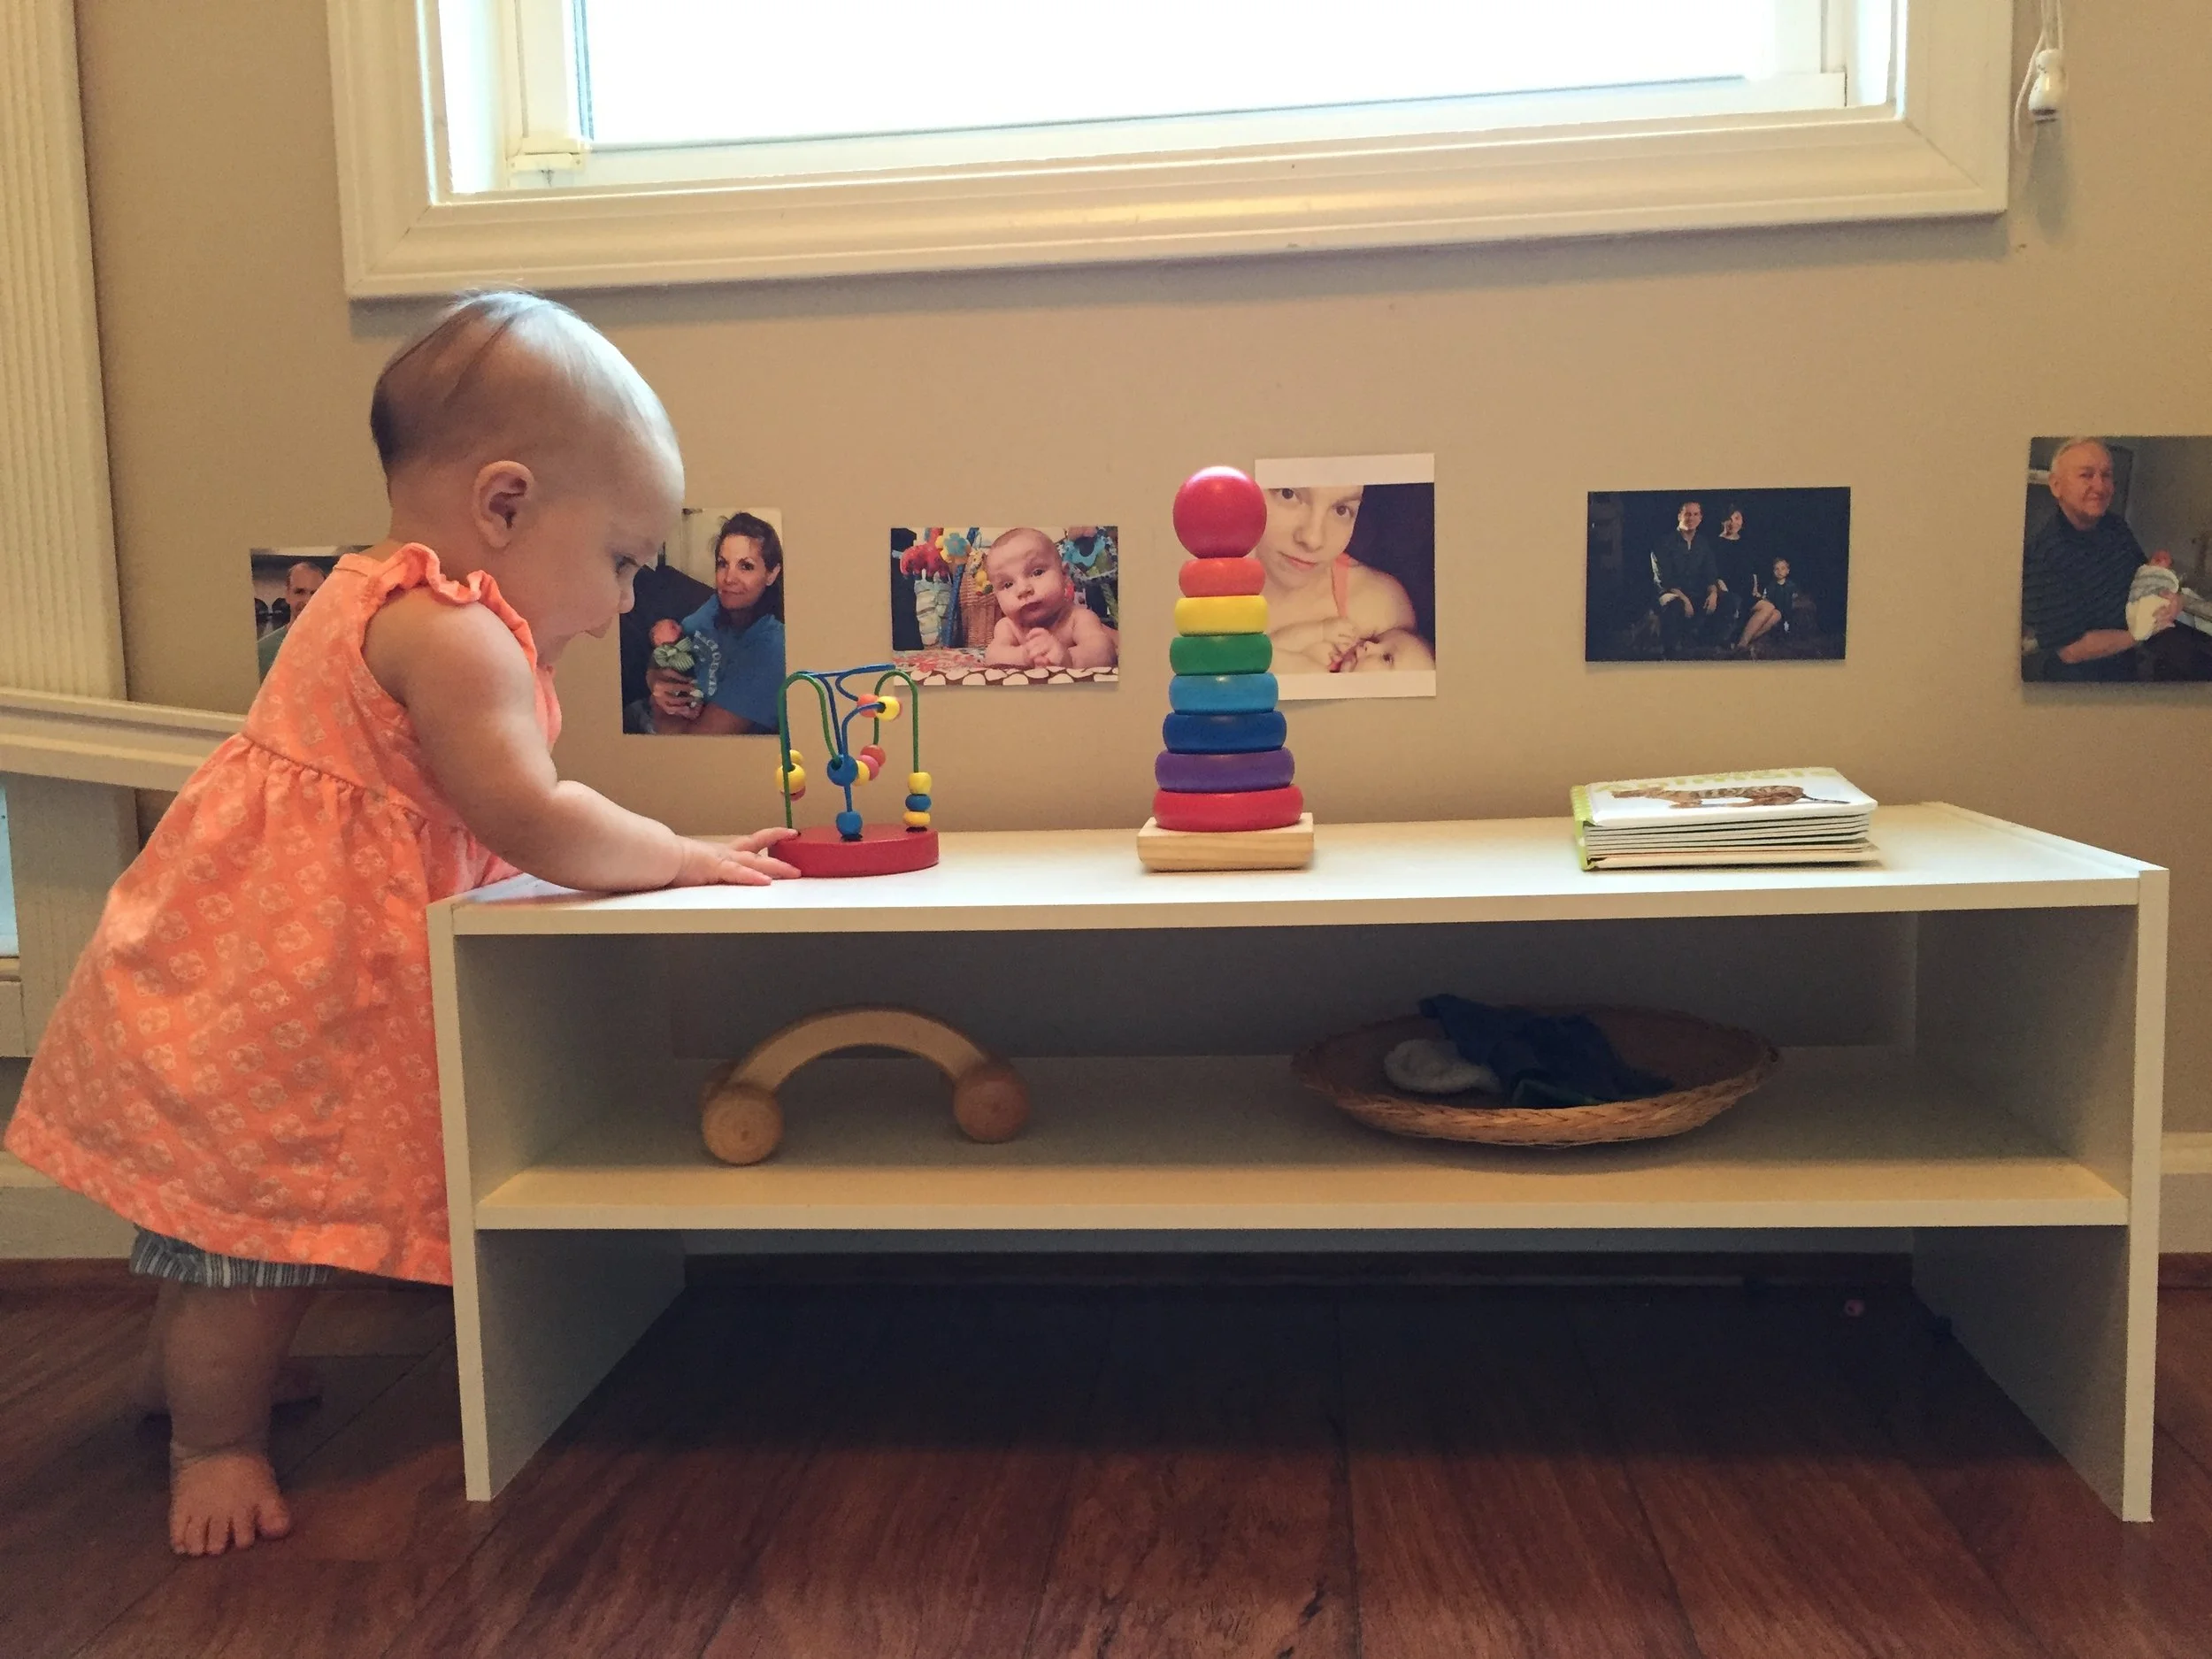
Finally, here is miss AB's little shelf. The top shelf has a ball maze, colorful tower (too many pieces, I know, but she isn't really able to stack anything yet anyway), and a textured book of animals.
The second shelf has a very simple car (I think it's actually a massage tool, but I got it for a dollar at the thrift store, SO IT'S A CAR!) and a little basket of different fabrics.
She mostly plays with Alexander's shelves, though, so I have to redirect her a lot. Currently it's going alright with the two of them in the room. We can't stay for more than about 45 minutes at a time because she gets bored/fussy/hungry/unknown. <3
Leave any questions you have in the comments, and I'd be happy to share. If you'd like the source of one of the materials, just ask!